Monday, October 31, 2011

HALLOWEEN HOT AIR BALLOONING AROUND BOSTON


This is me and my friend Kelly rockin our homemade Hot Air Balloon costume, no further words can be said about how hilarious this weekend was. So worth the labor of love we put into concocting this crazy outfit (Kelly even broke out her power tools). Hope your Halloween was as fun as mine! :)

HAPPY HALLOWEEN!


Wednesday, October 26, 2011

PROJECT: EXTERIOR PAINT BEFORE & AFTER

So my parents wanted some ideas on what colors they should repaint the exterior of their home, and I said I would help. My childhood home is small yet cozy, but it really needs a facelift. It has been forever cream and blah brown, almost tudorish (without actually being a tudor). I knew when I said grey my mom would immediately say no, so in order to prove my point I flexed my photoshoping skills and this is what I came up with. I'm digging the blue grey contrast with the white trim. It also doesn't hurt to play up the door and really throw in some stand out lighting. What do you think of what I'm proposing?

Tuesday, October 25, 2011

WONDERWOMAN

I had my eye on the cutest wonder woman costume but the best sets I have come across range from $395-$695!! I refuse to spend that much money for a costume I will only wear one night, so of course I ordered my costume at halloweenwarehouse.com for $50. I came home today to find my package waiting for me on the front porch, it came with the corset, a blue skirt with white stars, red cape, headband, cuff bands, and a belt. The cuff bands and the belt are the tackiest gold and don't look or fit right, plus I still need to buy sexy red leather knee high boots to complete the look. I figured since I saved so much money by not buying the expensive costume, I can splurge on "wonder woman-esque" accessories that I love and can wear again and again and again..


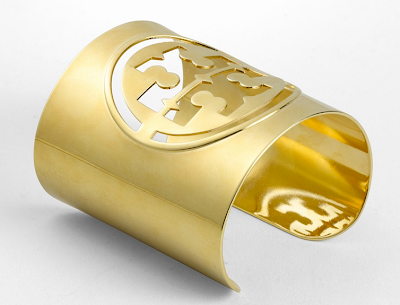
Tory Burch was definitely channeling Wonder Woman when she designed these large gold cuffs.

Another amazing option found on Max and Chloe


I really do like the corset that I ordered, but I couldn't resist posting this version by Zimmerman.


This belt is GORGEOUS and would look great with many, many outfits.
These Hadley Knee boots by Michael Antonio are PERFECT, I will be the most stylish superhero this Halloween.


Monday, October 24, 2011

ONE DAY MAKEOVER: BEFORE & AFTER

So we finally got our first chance to do a "One Day Makeover." And we wanted to share with you our success. I wish the photos could have been better, but hey I tried! Let us know what you think! 

 BEFORE 
AFTER
BEFORE
AFTER
We started out by determining what the homeowners wanted to keep and what could go, their style, and also their budget. The new sectional from Ethan Allen would stay along with the TV and its console, and the draperies, the rest was ours to play with. 

Then we scouted their home to find out what we could reuse from other rooms, discovering this light blue transitional rug from their adjacent dining room (below), to swap into their living room. We also pulled a Pottery Barn floor lamp with an adjustable table from their basement, a burl frame, a hurricane, books, and a blue vessel. 

Our first stop, a "Trade-Only" showroom, to pick up some glam necessities. We needed something to counter balance the warm wood of the TV console, so we went with a cocktail table with iron base and antique mirror top by Julian Chichester, and a gorgeous antique mirror lamp by Currey & Co.  


We also scooped up a few accessories including this blue coral on lucite base.


Next stop was Pottery Barn, where we picked up some fun textural giant knit pillows.  


And then we scored this gorgeous indoor/outdoor mosaic table from Crate & Barrel for 50% off. The iron base works with the cocktail table and the caramel colored glass mosaic top worked with the fabric in the sofa and paint on the walls. 


Last stop, good old HOME GOODS, where we got this great occasional chair with brass nail heads for only $199, some art, and great pillows. 


We heard the homeowner loved horses!


The ikat pillows only $19.99 from Home Goods. And look how reflective the gorgeous lamp is.


Flowers add a finishing touch :)

And in 7 hours with a budget of $2000 we managed to transform this couples living room into a warm and inviting space with a touch of glam and personality.




Friday, October 21, 2011

STEPH BEDROOM CONCEPT

For our next project, Steph's bedroom, we wanted to create a romantic sophisticated and cozy environment inspired by soft ivory cashmere and the faintest bit of coral, pink, and gold. Here's the concept board! What do you think? 


Have a great weekend!!!


Wednesday, October 19, 2011

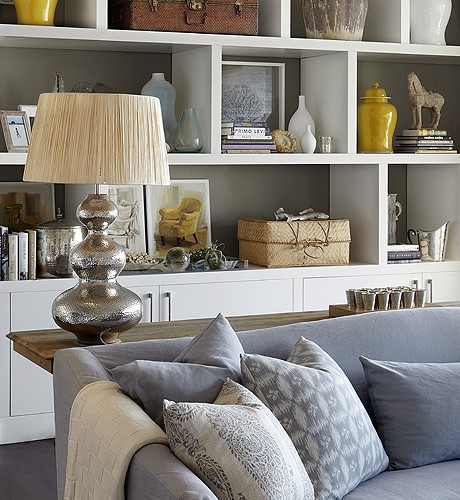
SHELF STYLING

Styling a bookshelf is part of what I do everyday at work, its the finishing touches that bring the entire design together. There should be balance to everything.


Some shelf styling tips I find work best are:

1. Paint or wallpaper the back of the bookshelves, its add dimension
.
2. Do you have a shelf with a lot of small objects and empty space? 
Lean a small picture frame or art behind it, it instantly completes the look.

3. If I have more than 1 of the same large items, I never put them in the same shelf.
If I use a large white gourd vase on the top right shelf, I put the second on the bottom left.

4. Take a step back after placing a few objects, take a look of your progress, if something isn't work it change it. The beauty about styling a shelf is you can keep rearranging, unlike a room full of furniture!

5. Use objects that are personal to you and show off who you are and what you love, I love to see something completely unexpected, as long as it works with your balance.


Beautiful objects carefully placed in shelves with pops of green for color.

This gold, white, and blue setting has a great natural flow.


This is what I consider great shelf styling, this gives your eye a nice flow.


Painting shelves black on the inside is an instant way to add contrast.

Monday, October 17, 2011

DIY: MARABOU FEATHER VEST

Happy Monday everyone! Today I wanted to share with you one of my creations that I got to sport this weekend, my marabou feather vest. I was actually in Nordstrom about a month ago and spotted this gorgeous combo by Haute Hippie. Well, that would have costed me over $700!!! 

INSPIRATION
$495!!!

$265!!

So I embarked on a journey to find "a look for less". And I found it!!! Seek and you shall find people, and a little creativity doesn't hurt either. So as I searched the internet I fell upon this great blog,  Love Maegan, where I found a killer tutorial on making your own marabou feather vest. So easy! All it required was...

1) a vest (I used my Express suit vest that I hadn't worn in forever) - FREE
2) about 6 marabou feather boas - $15
3) a needle and black thread - FREE
4) A bit of time and patience because you will be doing a lot of hand sewing


Here's the vest halfway done. My Nan is sporting it, she helped me thread the needles. How cute is she!!

And the look alike top I bought, was practically the same color. It is the Lucinda blouse in flame, from J. Crew. Originally $98, I got it 50% off!

And here I go sporting the vest, unfortunately not with the J. Crew blouse I bought but still the same silky glam effect. Unfortunately this shot was taken in a parking garage while waiting for the elevator. Sorry people I'm not the most photogenic, and this is the best shot I got, so this is what you get. :)


TOTAL COST OF INSPIRATION - $760

LOOK FOR LESS - $59


Thursday, October 13, 2011

DIY: Rhinestone Friendship Bracelets

As some of you may know I worship Doloris Petunia's work, and was recently inspired to make some jewelry of my own.
I may not be able to achieve the craftsmanship which is this bracelet above by DP (I swear that woman must have an army of ninja weavers) but I might be able to achieve something closer to this...


So I scoured the internet for some friendship bracelet tutorials, went to michael's and bought like 983769236 different colors of embroidery thread (only 35 cents per color!!), and purchased some pretty rhinestone and gold chain from eBay. After all my research, here are the two sites that had the most clear directions...Purl Bee and Honestly...WTF which really happens to be the name of the blog.


So here I go. I found it easy to utilize a piece of foam core with small incisions at the edges to keep all my string in place and organized. Don't you love the gold thread!

Finished product without the gold chain, which I just hand stitched into the bracelet.


TADAAAA!!


I'm digging the stacking trend happening these days.
Next adventure, Chan Luu style beaded wrap bracelets. Stay tuned!